The developers have been working long and hard to get this new feature launched for us, and we want to give a BIG shout-out to Josh and the developer team for all their hard work!! This new functionality allows you to set specific discounts for daily, weekly, time specific or repeating specials that your company may be running for promotional sales; and was quite a big build for us.
This new update will make doing repeating sales promotions much easier to maintain and track. It will allow you to print specific sale-priced barcodes, that will ring out according to the rules set within the Discount Engine. These rules allow you to set specific items/categories, vendors, percentage or dollar based discounts, and specific days of the week or time of day that the sale price will apply. You will also be able to cap the discount amount being given, with a maximum allowed discount setting.
The following is a brief introduction to the New Discount Engine, and how to start campaigning:

1. Within your managers employee permissions, find ID=164 and add this permission. (This is a manager/admin permission only)

2. Under System Maintenance, choose “Set Manager Discounts – Discount Engine”. This will take you to the editor where you will create or edit your discounts.
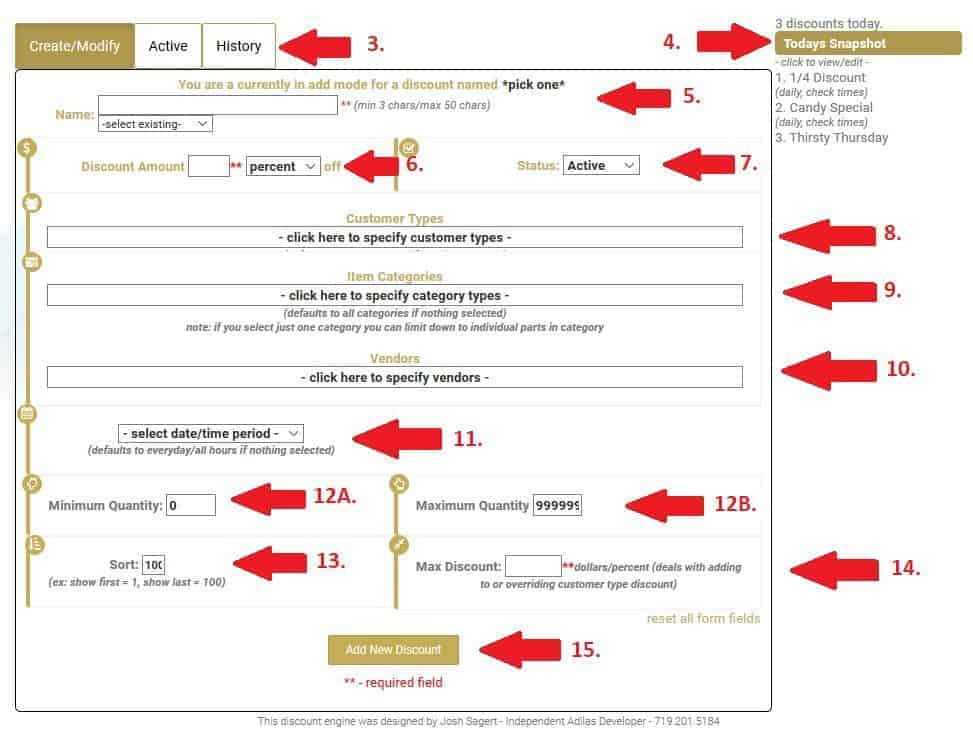
3. These tabs allow you to toggle between Adding/Editing Discount Campaigns, Viewing Currently Active and Inactive/Expired Discount Campaigns.
4. Discount campaigns that are active for the current day/time are listed to the right-hand side.
5. Name your discount campaign (to create new) or select an existing discount campaign from the dropdown list (to edit). Remember: If you are creating a new discount campaign, it must have a different name from all other discount campaigns. If it is the same name, you will flip to edit mode on that campaign, instead of creating a new one.
6. Set your discount by percentage or dollar amount.
7. This allows you to use or not use a discount. Switch on and off as needed. (This will switch them between the top tabs [#3])
8. Select which customers are allowed to receive this discount. Choose between already assigned customer types.
9. Select the categories that will be included in this campaign. If you select specific categories, you will have the option to drill down further to a specific item.
10. Specify a specific vendor if necessary.
11. Select when you want this campaign to run.
12A/B. If desired, select a minimum or maximum number of individual line items to be discounted.
13. If desired, you can sort your campaign list with this numbered sort option. If not, leave auto-filled at 100.
14. If desired, choose a maximum discount. This will keep any discounts set within the individual patient log, from stacking on top of your campaign discount. If stacking is ok, leave blank.
Now that we have the this update released, we look forward to receiving your feedback on the functionality or the impact you feel this may have on your business’ functionality. We welcome any comments or concerns you may have.
As always, feel free to reach out to your consultant or Adilas Technical Support with any questions you may have. The phone number for Technical Support is 719-966-7102 or you can email support@adilas.biz.